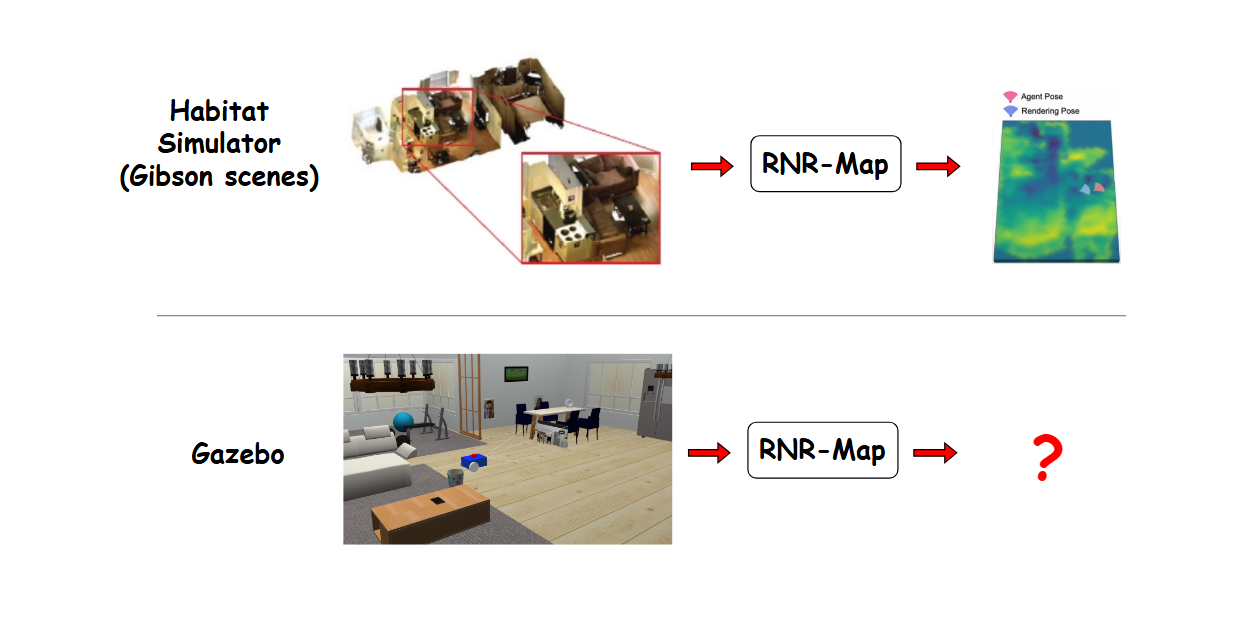
Renderable Neural Radiance Map (RNR-Map) + Gazebo (part 1)
Deploy RNR-Map (trained in Habitat simulator) into Gazebo + ROS2 environment for Visual Navigation
Goals
In this post, I want to walk you through some curiosities:
- Embed a Gazebo world into a 2D NeRF-based latent map (RNR-Map)
- Explore (render views) from only embedded RNR-map (without launching Gazebo/ROS package)
- Image-goal localization in a Gazebo world
- Starting point for fine-tuning/improving RNR-Map models into other scenarios (i.e: AMR), more complex agent movements, simulations (outside Habitat), real world, etc.
RNR-Map Overview
Problems
 Source: RNR-Map presentation video
When an agent is navigating 3D environment,
- How to embed visual information from 3D environment into a 2D form ?
- How to use the 2D form for visual navigation ?
Concept
 Adapted from: RNR-Map paper
- Grid of Latent Codes: Instead of storing occupancy or semantics, RNR‑Map lays out a 2D grid where each cell holds a learned latent code embedding visual features from RGB‑D observations.
- Renderable with NeRF: Those latent codes condition a lightweight neural radiance field decoder (GSN), so you can instantly render what the agent “would see” from any camera pose inside the mapped area.
Advantages
- Visually Descriptive Mapping: Classic grid maps only know “occupied vs free” (or semantic labels). RNR‑Map’s latents capture appearance -> so you can ask “where in the map does this photo belong?” and even render novel views.
- Generalization to New Scenes: Unlike per‑scene NeRFs that need expensive retraining, RNR‑Map uses a shared encoder/decoder trained offline on diverse data. Leveraging generative scene network (GSN), the neural radiance fields of RNR-Map are conditioned on the latent codes. At deployment it instantly embeds any unseen environment -> no fine‑tuning required.
- Dual Use: You can bypass rendering and directly compare latent codes for ultra‑fast image‑based localization, or invoke the decoder for photometric pose refinement (camera tracking).
- Real‑Time Capable: the mapping and image-based localization frameworks operate at 91.9Hz and 56.8Hz (Intel i7-9700KF CPU @ 3.60GHz, and an NVIDIA GeForce RTX 2080 Ti GPU)
RNR-Map shows promising results in Habitat simulator, training RNR-Map models on existing 3D indoor datasets (i.e: Gibson), but its deployment into other simulations or real world environment (our ultimate goal) may pose undiscovered challenges. The rest of this post will show you how to deploy RNR-Map into a Gazebo world, whose visual information might be less realistic than those datasets, and see its robustness performance.
Installation
- Install Gazebo classic (with ROS2):
1
sudo apt install ros-[YOUR_DISTRO]-gazebo-ros-pkgs
- Install
teleop-twist-keyboardpackage (to control robot for collecting data):1
sudo apt install ros-[YOUR_DISTRO]-teleop-twist-keyboard
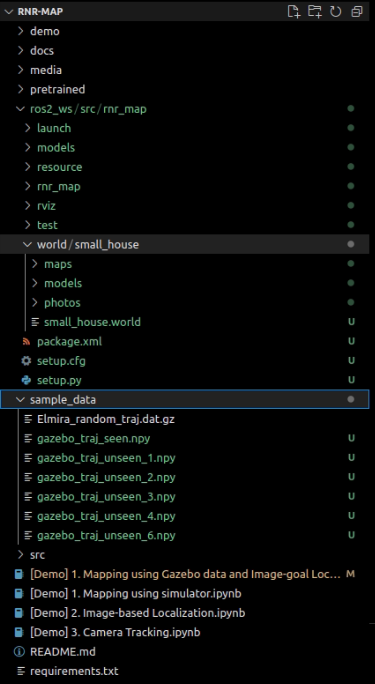
- Clone my repo: RNR-Map + ROS2
1 2
git clone https://github.com/bachzz/RNR-Map cd RNR-Map - Download sample Gazebo data, world files, unzip into this folder structure:
- Create new
condaenvironment, activate, install libraries:1 2 3
conda create -n rnr-map python=3.8 conda activate rnr-map pip install -r requirements.txt
Note: You should choose python version 3.8 if you want to test on Habitat environments, more details here, they say at least 3.8, but I encounter libraries building issues with >= 3.9
Demo (Habitat data vs Gazebo data)
Now our environment is setup, we can demo RNR-Map on some sample data from both Habitat and Gazebo. RNR-Map repo provides you a sample recorded trajectory data (rgb, depth, odometry) of an agent moving in a Gibson scene with Habitat simulator, so you don’t have to install its simulation. For Gazebo, I have collected sample data for you, and we will use sample_data/gazebo_traj_seen.npy that you previously downloaded.
In this demo, we would like to focus on the main features of RNR-Map, including Embedding + Reconstruction, and Image-goal Localization. Let’s walk you through the cells in my modified notebook [Demo] 1. Mapping using Gazebo data and Image-goal Localization.ipynb.
You can select either the Habitat data or Gazebo data
1
2
3
4
5
### Habitat sample data ###
# data = joblib.load("sample_data/Elmira_random_traj.dat.gz")

### Gazebo data ###
data = np.load("sample_data/gazebo_traj_seen.npy", allow_pickle=True).item()
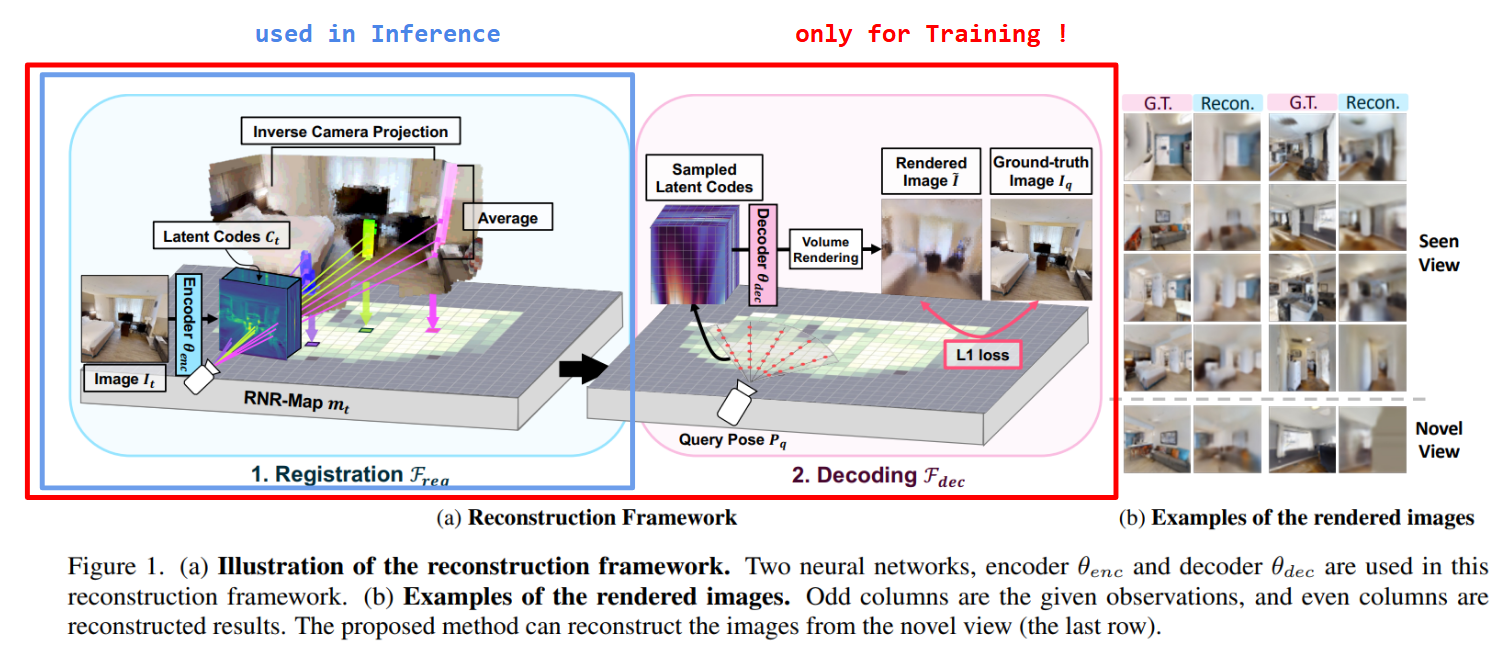
Embedding (Registration) + Reconstruction (Decoding)
1
2
3
4
5
6
7
Embedding:
- input: rgb, depth, odometry (at each robot state)
- output: 2D latent map of radiance field features

Reconstruction:
- input: 2D latent map + query camera pose
- output: reconstructed image
You can run Embed RNR-Map along trajectory cell for the Embedding step.
Note: for Habitat data, comment out these lines that convert the odometry from Gazebo to RNR-Map coordinate system
1
2
3
4
5
6
7
8
9
10
11
12
13
####### convert from Gazebo coord to RNR-Map coord
t_ = np.zeros(3)
R_ = q.from_rotation_matrix(Rt_t[:3,:3])

R_.y = R_.z; R_.z = 0
t_[0] = -Rt_t[1,3]
t_[2] = -Rt_t[0,3]
t_[1] = Rt_t[2,3]

Rt_t[:3, 3] = t_
Rt_t[:3, :3] = q.as_rotation_matrix(R_)

#############
Per iteration, the embedder encodes the input data at each robot position:
1
w, w_mask = embedder.embed_obs(input_dict, past_w=w, past_w_num_mask=w_mask)
(Optional) You can also reconstruct the viewpoint rgb from embedded latent code, for visualization purpose:
1
recon_rgb, _ = embedder.generate(w, {'Rt': Rt_t.unsqueeze(1), 'K':K.unsqueeze(1)}, out_res=64)
Visualizations of what the embedder encodes at each position: 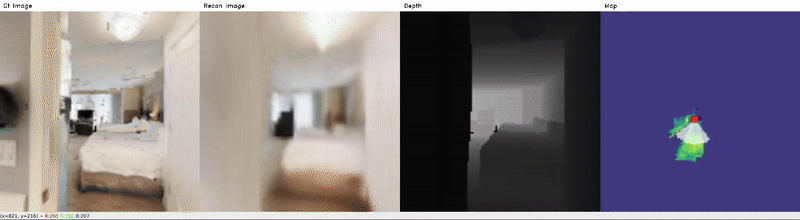 From Habitat data
 From Gazebo data
It can be seen that the reconstructed image in Gazebo can still maintain limited shape information for a few big basic objects (i.e: floor, fridge, door), but it struggles with other objects since they have detailed texture at close-up. The trained decoder in RNR-Map is still limited with reconstructing details, as seen in the Habitat reconstruction results. Nevertheless, the reconstruction is only for visualization purpose as stated in their paper, their main purpose is to obtain an 2D latent map useful for visual navigation. The embedded map obtained from Gazebo data seems to capture accurate environment boundaries, semantic levels of objects, and robot’s traversed path. Next, we will see the robustness of this map when used for image-goal localization.
Note: (Optional) You can run
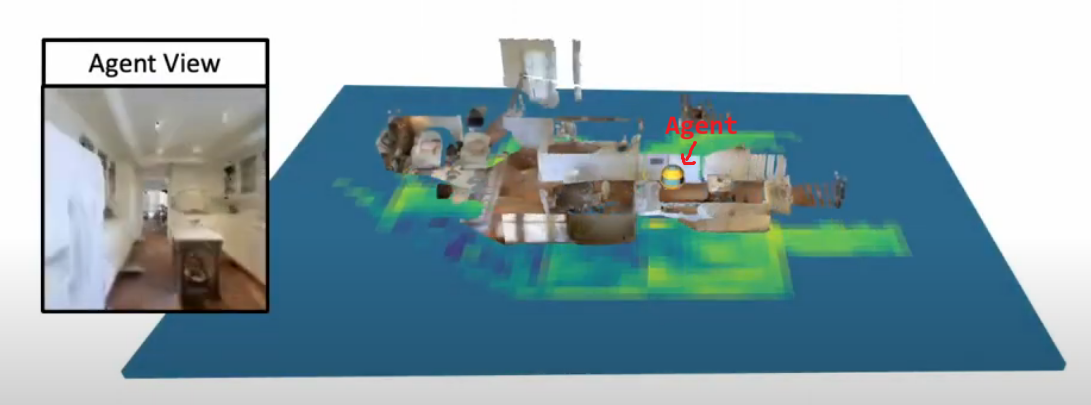
Explore inside RNR-Mapcell to move around the built map, and observe the “NeRF” environment. This doesn’t require launching any simulator.
Image-goal Localization
1
2
- input: 2D latent map + query image
- output: position + orientation on 2D latent map
Seen images
Run Localize seen images (images used to embed RNR-Map) cells for either Habitat or Gazebo data.
Note: Again, comment out the lines following
convert from Gazebo coord to RNR-Map coordif you use Habitat data
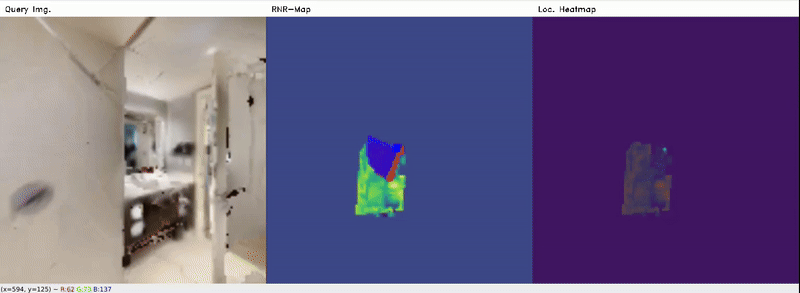 From Habitat data (seen)
 From Gazebo data (seen)
Red denotes the ground-truth pose, and Blue denotes the predicted (localized) pose. Location heatmap shows regions with probability score where the query image might belong to. It can be seen that the Localizer model still can roughly estimate correct poses, at least the positions, in the Gazebo data for most cases, from only 2D latent codes, despite poor reconstruction. Typically, for well-reconstructed objects (i.e. fridge, door), the poses are more accurate.
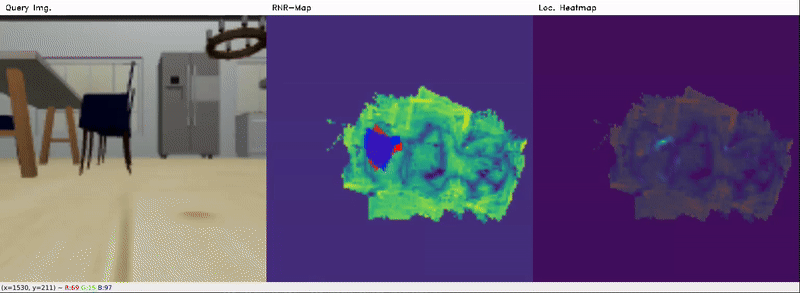
Unseen images
Next, we will use Gazebo images that are not seen during RNR-Map embedding to see how it is generalizable to novel views.
Run the Localize unseen images (not observed during exploration) cells, and you will obtain the following example results:
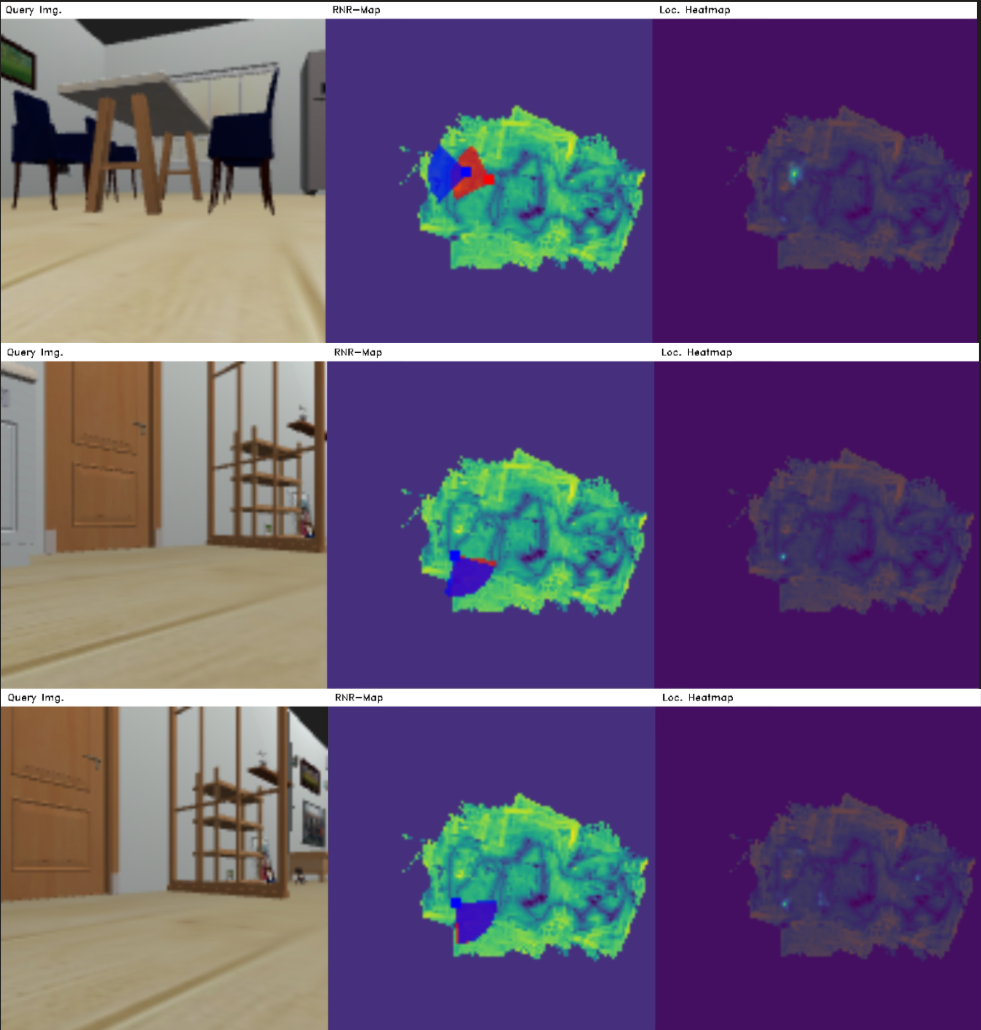 From Gazebo data (unseen)
Record new data (Gazebo)
Alright, now we know the basic capabilities of RNR-Map (it can also generate navigation strategies, camera tracking, but we may continue in future posts). But we’ve only been using my collected data so far, let’s capture your own using my provided ros2 package.
Configure sam-bot URDF
First, we start with configuring our robot. We can re-use an existing sam-bot model from the Nav2 tutorials.
Aside from minor modifications to robot parts’ inertial, material, we need to configure its camera sensor <gazebo> parameters (how it behaves in actual simulation), as followings:
1
2
3
4
5
6
7
8
9
10
11
12
13
14
15
16
17
18
19
20
21
22
23
24
25
26
27
28
29
30
31
<gazebo reference="camera_link">
    <material>Gazebo/Black </material>

    <!-- <sensor name="camera_rgb" type="camera"> -->
    <sensor name="camera_depth" type="depth">
      <pose> 0 0 0 0 0 0 </pose>
      <visualize> true </visualize>
      <update_rate> 10 </update_rate>

      <camera>
        <!-- <horizontal_fov>1.089</horizontal_fov> -->
        <image>
          <width>128</width>
          <height>128</height>
          <format>R8G8B8</format>
        </image>
        <clip>
          <near>0.05</near>
          <far>12.0</far>
        </clip>
      </camera>

      <plugin name="camera_controller_depth" filename="libgazebo_ros_camera.so">
        <ros>
          <namespace>demo</namespace>
        </ros>
        <frame_name>camera_optical_link</frame_name>
      </plugin>

    </sensor>
</gazebo>
You can choose whether to use rgb or rgb-depth camera using type param. The update_rate of camera should be same as of differential drive plugin that we will set for the wheels later. Camera width and height should be set to 128 since the RNR-Map models were trained on this size. near and far is the min and max depth range, you should pay attention to the max depth value and change correspondingly in the extract_data node that we’ll discuss later. In camera_controller_depth, we set the namespace to output data, as well as frame_name.
Note: We reference it to a dummy
camera_optical_linkinstead ofcamera_linkto handle coordinate transformation from camera image plane (xright,ydown,zforward) to ROS body standard (xforward,yleft,zup). Check here for further details.
Next, we configure the differential drive plugin for the wheels
1
2
3
4
5
6
7
8
9
10
11
12
13
14
15
16
17
18
19
20
21
22
23
24
25
26
27
28
29
30
31
32
33
34
35
36
37
38
<gazebo>
    <plugin name='diff_drive' filename='libgazebo_ros_diff_drive.so'>
    <ros>
        <namespace>demo</namespace>
    </ros>

    <topic>cmd_vel</topic>

    <update_rate>10</update_rate>

    <left_joint>drivewhl_l_joint</left_joint>
    <right_joint>drivewhl_r_joint</right_joint>

    <wheel_separation>0.4</wheel_separation>
    <wheel_diameter>0.2</wheel_diameter>

    <max_wheel_torque>20</max_wheel_torque>
    <max_wheel_acceleration>1.0</max_wheel_acceleration>

    <!-- When false, publish no wheel odometry data to a ROS topic -->
    <publish_odom>true</publish_odom>

    <!-- When true, publish coordinate transform from odom to base_footprint -->
    <!-- I usually use the robot_localization package to publish this transform -->
    <publish_odom_tf>true</publish_odom_tf>

    <!-- When true, publish coordinate transform from base_link to the wheels -->
    <!-- The robot_state_publisher package is often used to publish this transform -->
    <publish_wheel_tf>true</publish_wheel_tf>

    <odometry_source>0</odometry_source>

    <odometry_topic>odom</odometry_topic>
    <odometry_frame>odom</odometry_frame>
    <robot_base_frame>base_link</robot_base_frame>

    </plugin>
</gazebo>
Here you should pay attention to publish_odom, publish_odom_tf, publish_wheel_tf,odometry_topic,odometry_frame,robot_base_frame to publish the ground truth odometry / robot’s pose (required as inputs for RNR-Map).
extract_data node
Configure MAX_DEPTH, odometry topic, rgb topic, depth topic:
1
2
3
4
5
6
7
8
9
10
11
12
13
class ExtractData(Node):
    def __init__(self):
        super().__init__('extract_data')

        self.MAX_DEPTH = 12 # max depth range of RGB-D camera in robot

        self.bridge = CvBridge()

        self.odom_sub = self.create_subscription(Odometry, "/demo/odom", self.odom_sub_callback, 10)
        self.im_rgb_sub = self.create_subscription(Image, "/demo/camera_depth/image_raw", self.im_rgb_sub_callback, 10)
        self.im_depth_sub = self.create_subscription(Image, "/demo/camera_depth/depth/image_raw", self.im_depth_sub_callback, 10)

        self.data_out = {'position':[], 'rotation': [], 'rgb':[], 'depth': []}
Preprocess odometry, rgb, depth:
1
2
3
4
5
6
7
8
9
10
11
12
13
14
15
16
17
18
19
20
21
22
23
24
def odom_sub_callback(self, msg):
        x = msg.pose.pose.position.x
        y = msg.pose.pose.position.y
        z = msg.pose.pose.position.z

        qx = msg.pose.pose.orientation.x
        qy = msg.pose.pose.orientation.y
        qz = msg.pose.pose.orientation.z
        qw = msg.pose.pose.orientation.w

        self.data_out['position'].append([x, y, z])
        self.data_out['rotation'].append([qw, qx, qy, qz])

    def im_rgb_sub_callback(self, msg):
        im_rgb = self.bridge.imgmsg_to_cv2(msg)
        self.data_out['rgb'].append(im_rgb)

    def im_depth_sub_callback(self, msg):
        im_depth = self.bridge.imgmsg_to_cv2(msg)
        im_depth[np.isinf(im_depth)] = 0
        im_depth = im_depth / self.MAX_DEPTH ## normalize to [0., 1.]
        im_depth = im_depth[:, :, np.newaxis]

        self.data_out['depth'].append(im_depth)
Shutdown callback, then save into a numpy file:
1
2
3
4
5
6
7
8
9
10
11
12
13
14
15
16
17
18
19
20
21
def shutdown_callback(self):
        print('[*] shutting down ...')
        self.data_out['position'] = np.array(self.data_out['position'])
        self.data_out['rotation'] = np.array(self.data_out['rotation'])
        self.data_out['rgb'] = np.array(self.data_out['rgb'])
        self.data_out['depth'] = np.array(self.data_out['depth'])
        np.save('data_out.npy', self.data_out)


def main(args=None):
    rclpy.init(args=args)
    node = ExtractData()

    try:
        rclpy.spin(node)
    except KeyboardInterrupt:
        pass
    finally:
        node.shutdown_callback()
        node.destroy_node()
        rclpy.shutdown()
Launch file
We launch the following: robot_state_publisher, joint_state_publisher, gazebo, spawn_entity (spawn robot into gazebo), and rviz2 for visualization
1
2
3
4
5
6
7
8
9
10
11
12
13
14
15
16
17
18
19
20
21
22
23
24
25
26
27
28
29
30
31
32
33
34
35
36
37
38
39
40
41
42
43
44
45
46
47
48
49
50
51
52
53
54
55
56
57
58
59
60
61
62
def generate_launch_description():
    pkg_path = launch_ros.substitutions.FindPackageShare(package='rnr_map').find('rnr_map')
    gazebo_path = launch_ros.substitutions.FindPackageShare(package='gazebo_ros').find('gazebo_ros')

    world_path = f'{pkg_path}/world/small_house/small_house.world'
    default_model_path = f'{pkg_path}/models/robot.urdf'
    default_rviz_config_path = f'{pkg_path}/rviz/config.rviz'

    robot_state_publisher_node = launch_ros.actions.Node(
        package = 'robot_state_publisher',
        executable = 'robot_state_publisher',
        parameters = [
            {'robot_description': Command(['xacro ', LaunchConfiguration('model')])},
            {'use_sim_time': LaunchConfiguration('use_sim_time')}
        ]
    )

    joint_state_publisher_node = launch_ros.actions.Node(
        package = 'joint_state_publisher',
        executable = 'joint_state_publisher',
        parameters = [
            {'use_sim_time' : LaunchConfiguration('use_sim_time')}
        ]
    )

    spawn_entity = launch_ros.actions.Node(
        package = 'gazebo_ros',
        executable = 'spawn_entity.py',
        arguments = ['-entity', 'test_bot', '-topic', 'robot_description', '-x', '4.0', '-y', '0.0', '-z', '0.5'],
        output = 'screen'
    )

    rviz_node = launch_ros.actions.Node(
        package = 'rviz2',
        executable = 'rviz2',
        name = 'rviz2',
        output = 'screen',
        arguments = ['-d', LaunchConfiguration('rvizconfig')]
    )

    launch_gazebo = launch.actions.IncludeLaunchDescription(
        launch.launch_description_sources.PythonLaunchDescriptionSource(f'{gazebo_path}/launch/gazebo.launch.py'),
        launch_arguments={
            'verbose':'true',
            'world' : [world_path],
            'on_exit_shutdown': 'True'
        }.items()
    )

    return launch.LaunchDescription([
        launch.actions.SetEnvironmentVariable(name='GAZEBO_MODEL_PATH', value=[launch.substitutions.EnvironmentVariable('GAZEBO_MODEL_PATH'), f':{pkg_path}/world/small_house/models/']), #[f'{pkg_path}/world/small_house/models/']),
        launch.actions.SetEnvironmentVariable(name='GAZEBO_RESOURCE_PATH', value=[launch.substitutions.EnvironmentVariable('GAZEBO_RESOURCE_PATH'), f':{pkg_path}/world/small_house/']),
        launch.actions.DeclareLaunchArgument(name='model', default_value=default_model_path),
        launch.actions.DeclareLaunchArgument(name='use_sim_time', default_value='True'),
        launch.actions.DeclareLaunchArgument(name='rvizconfig', default_value=default_rviz_config_path),

        robot_state_publisher_node,
        joint_state_publisher_node,
        launch_gazebo,
        spawn_entity,
        rviz_node
    ])
This is a fairly simple package. Once you’ve done reviewing the code or started from scratch, go to RNR-Map/ros2_ws or your own ros2 workspace folder, run colcon build to build the package.
Record data
To capture data, you run these commands on 3 terminals:
1
2
# terminal-1: launch the package
ros2 launch rnr_map rnr_map.launch.py
1
2
# terminal-2: record bag file to file named "bag-1"
ros2 bag record /demo/odom /demo/camera_depth/image_raw /demo/camera_depth/depth/image_raw -o bag-1
1
2
# terminal-3: control robot with teleop_twist_keyboard package
ros2 run teleop_twist_keyboard teleop_twist_keyboard cmd_vel:=/demo/cmd_vel
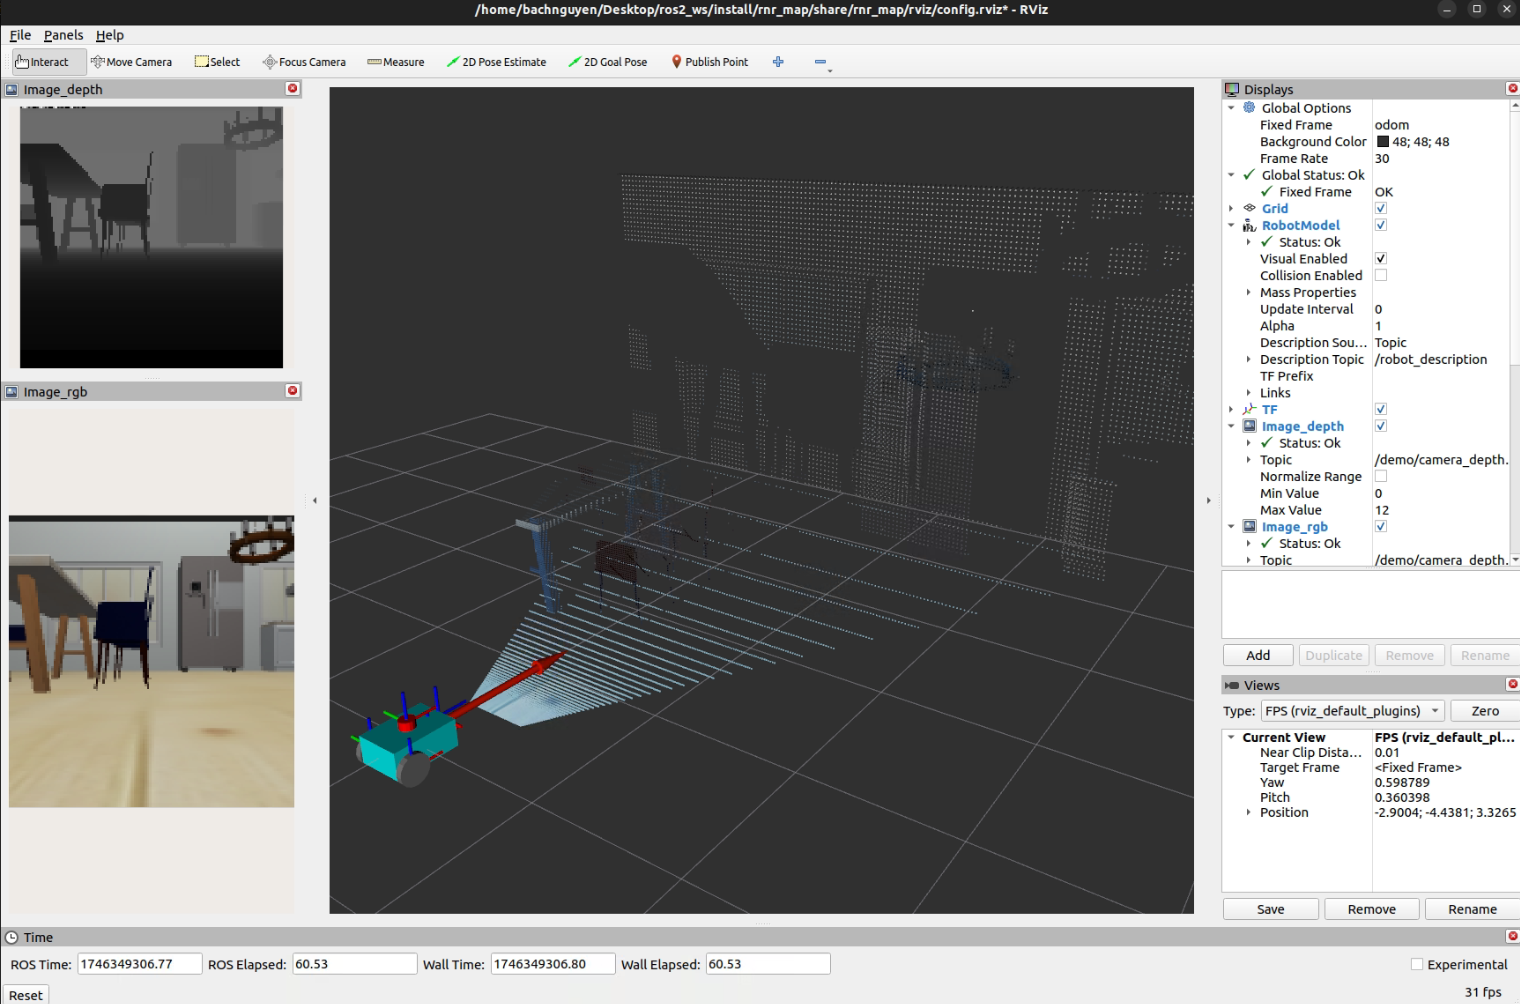
Once you launch the package, you will see the following Rviz2 window, aside from Gazebo:
To extract data, you run these commands on 2 terminals:
1
2
# terminal-1: run extract_data node
ros2 run rnr_map extract_data
1
2
# terminal-2: play bag file "bag-1"
ros2 bag play ./bag-1/
And that’s it ! Now you know the basics of RNR-Map, and how to capture new data from more common simulators like Gazebo, then embed these data onto RNR-Map for visual navigation.
Thank you for reaching this point :)
What’s next?
As you can see, we haven’t retrained RNR-Map models on Gazebo data, but it still can generally localize well when observing objects with somewhat defined reconstructions (i.e: fridge, door). Possible reason for this is that they are simply large objects with few details, thus a single latent code might not capture sufficient information?
- Reconstruction: How should we improve the handling of latent code to better reconstruct fine-grained details? RNR-Map++ might be an option. What about Gaussian Splatting? I’m curious.
- Localization: Can integrating natural language latent embeddings improve its localization ability? Le-RNR-Map might be an option. Moreover, this may enable further tasks such as object-goal localization (i.e: you ask ‘go to where I cook’, robot moves to kitchen)